Domestic
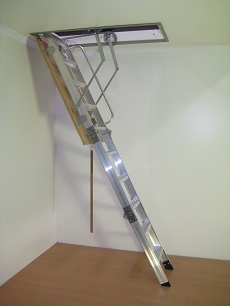
AM-BOSS present a domestic series of loft ladders that allows you to safely access and utilise empty roof space.


AM-BOSS pull-down access ladders with CodeMark certification are compliant when manufactured
Unauthorised altering, modifying, cutting, or failure to follow the appropriate Installation Guide will
VOID our Warranty and CodeMark certification
What is the cut-out required for the Domestic attic ladders? (Commercial Series Models differ).
For ceiling heights up to 2800mm:
'Access-Boss' and 'Access-Meister' Models ceiling cut-out is 1220mm x 570mm;
‘Big-Boss’ Models ceiling cut-out is 1220mm x 770mm.
For ceiling heights from 2800mm up to 3800mm:
'Access-Boss' and 'Access-Meister' Models ceiling cut-out is 1520mm x 570mm;
Note: 'Access-Meister' Models are not available above 3400mm.
‘Big-Boss’ Models ceiling cut-out is 1520mm x 770mm.
Chat with our team to learn more about ceiling cut-outs for ceilings that are larger than 3800mm.
Are your products sold as complete sets?
Yes. Our pull-down access ladders come fully assembled—complete with hook and pole, frame, architrave, screws.
Can you customise your designs by adding handrails?
Yes. Handrails for attic ladders are optional. Choose from the standard option (fixed to the top section) or full-length (fixed to the top and middle section).
Do you trim existing models to fit?
We design our own products to specification so cutting finished items is not necessary. We believe the first step should be equidistant when compared to the other steps. Each AM-BOSS attic access ladder, (domestic series models) caters for a height variation of approximately 200mm for ceiling heights up to 3600mm.
Are AM-BOSS access solutions easy to install?
Yes. You can either DIY or call AM-BOSS to organise a professional installation.
Can I purchase a custom fall-arrest system?
Yes! We fashion a range of designs to suit specific environments. Talk to us about your requirements today.
Are your products manufactured in Australia?
Yes. Our factory is located in Sunshine North, Melbourne.
How do I determine the most suitable model?
Simply measure from your finished floor to the underside of your ceiling and then find the model that fits. Each design caters for a specified ceiling height. For example, if your ceiling height is 2400mm—the corresponding model is 2345, which is appropriate for ceiling heights between 2300mm and 2450mm. If you are unsure just give us a call.
Do you sell direct?
Yes. We can arrange delivery to almost anywhere worldwide.
Do you have an outlet interstate?
We have distributors in every state and territory in Australia.
What does ‘load rating’ mean?
The AM-BOSS pull-down access ladder was physically tested by Metlabs in Melbourne and was rated at 150kg at any given point. Note: this is not a spread weight. 120kg Load Rating is considered ‘Industrial’ strength — and we surpass this.
Do you have a question that we have not answered here? Call AM-BOSS today.
GUIDE TO INSTALLATION
AM-BOSS Access Ladders are CodeMark Certified
! IMPORTANT ! READ ALL OF THIS TEXT, TO PREVENT INJURY AND AVOID MISTAKES
GUIDE TO INSTALLATION FOR TYPES: ‘ACCESS-BOSS™’ AND ‘ACCESS-MEISTER™’
STEP ONE: To get started, find the right location. Easy access top and bottom is essential. Make sure there is enough room to unfold the ladder (refer to Diagram / Table overleaf – Maximum Clearance at 60°).
IMPORTANT NOTE: CUT-OUT NOT TO BE WIDER AS SHOWN (570mm)
STEP TWO: What you need to make the opening – Timber Joist (Fig. 1 and Fig. 2): Timber, MPG10, 90x45mm pine or hardwood, about four (4) metres will be enough, pick a straight piece with minimal knots, and about 2 doz. 90mm long nails.


What you need to make the opening – Trusses (Fig. 3):
Trusses at 600mm centres should give you a clear distance of 565mm between. Insert a trimmer at length of 568mm (if Trusses are spaced at less than 565mm in between, smaller hatches can be manufactured at extra cost). DO NOT CUT TRUSSES without Building Surveyor approval.

Web of trusses NOT SHOWN for clarity of sketch.
To mark out the opening on the ceiling: Either (from below) hammer nails through the plaster or (from above) measure from the top plates of the walls, which are usually visible. DO NOT STAND on the plaster ceiling or on timber joists that you had to cut, before it is nailed back to secure timber. A short plank is handy. It is best to do the timber work first, from above. Double check the cut out size and measure diagonally for square, if correct, cut out the plaster. You are now ready to install the unit.
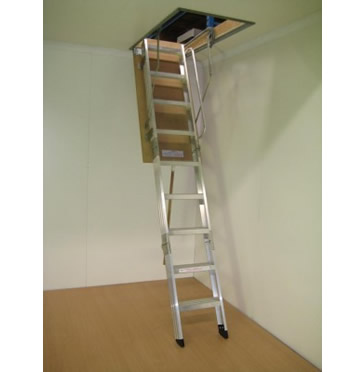
Once the opening in the ceiling has been made, installation is a breeze.
! IMPORTANT ! READ ALL OF THIS TEXT, TO PREVENT INJURY AND AVOID MISTAKES
STEP THREE: Installation of the pull-down access ladder, into the readymade opening: Fit eyebolt to panel. Make sure opening end of hatch is where it should open and have someone assist you for 5 minutes to push the fully assembled access ladder into the ceiling, ensuring the architrave is hard against the plaster. The unit is now in the right position and should not fall back out - fitted Fixing Clips will take care of that. Gently open the hatch panel with the hook & pole supplied, by placing the hook through the eyebolt, (at this time, with one hand keeping pressure against the architrave at the opening end) immediately screw one screw (8 x Type 17 Hex screws 12-11 x 65mm supplied, or use similar) into each pre-drilled hole on either side at opening end through frame to timber to secure. Unfold the ladder. DO NOT WALK ON THE LADDER AT THIS TIME. Now screw remaining six (2x3) screws into the remaining pre-drilled holes. You may have to loosen or tighten the eight (8) fixing screws on one side or the other to adjust the gap evenly on both sides between the architrave and the panel. Now all you have to do is adjust the ladder (two screws with lock nuts – refer Adjustment sticker inside frame), so that feet are on the floor and hinges are closed ie butted against each other, finished.
If you cannot get someone to help you: Remove the ladder assembly only from the panel, (4 or 6 nuts depending on model) to lighten the ![]()
![]() load. Make sure the hatch panel opens at the right end. With a rope, pull the hatch from above into the ceiling. Make sure the hatch-architrave is hard against the ceiling. Fix the frame by screwing the eight screws (supplied) through frame to timber to secure. From below open the hatch, ! ATTENTION ! Be careful - without the weight of the ladder it is possible for the panel to fly up. Keep the ladder assembly nearby and fit it back on the panel with the 4 or 6 nuts. Do not over tighten the nuts. You may have to loosen or tighten the eight (8) fixing screws on one side or the other to adjust the gap evenly on both sides between the architrave and the panel. Now all you have to do is adjust the ladder (two screws with lock nuts – refer Adjustment sticker inside frame), so that feet are on the floor and hinges are closed ie butted against each other, finished.
load. Make sure the hatch panel opens at the right end. With a rope, pull the hatch from above into the ceiling. Make sure the hatch-architrave is hard against the ceiling. Fix the frame by screwing the eight screws (supplied) through frame to timber to secure. From below open the hatch, ! ATTENTION ! Be careful - without the weight of the ladder it is possible for the panel to fly up. Keep the ladder assembly nearby and fit it back on the panel with the 4 or 6 nuts. Do not over tighten the nuts. You may have to loosen or tighten the eight (8) fixing screws on one side or the other to adjust the gap evenly on both sides between the architrave and the panel. Now all you have to do is adjust the ladder (two screws with lock nuts – refer Adjustment sticker inside frame), so that feet are on the floor and hinges are closed ie butted against each other, finished.
You are now ready to enjoy your new access system.
! IMPORTANT ! READ ALL OF THIS TEXT, TO PREVENT INJURY AND AVOID MISTAKES
OPERATING AND MAINTANANCE PROCEDURE
ON AM-BOSS ACCESS LADDERS
Am-boss Access Ladders work on a reliable counter balance spring system.
OPENING
Engage hook on pole (supplied) into small eyelet on opening end of ceiling access panel. Gently pull door open till it comes to rest against the stops on the adjusting mechanism. No need to unhook the pole from the panel. With both hands unfold and extend the ladder to the floor.
CLOSING
With both hands lift up bottom section of ladder and fold back up on top of each other. With the use of the pole gently first push then ease panel back up till it is fully closed. The spring counter balance system will keep the panel shut.
All moving parts are factory pre-lubricated and lubrication should not be required for some time. However should operation of the unit be in excess of 3 to 5 times a day, all moving parts are to be lubricated once every two months. Most important is the lubrication of the Pivot Point of the linkage-arms joined to the side plate with the adjusting system. This part does most of the work.
INSPECTION OF THE WHOLE SYSTEM SHALL BE CARRIED OUT ONE A YEAR AND ACTION TAKEN
![]()
|
Cut out NOT TO BE WIDER as shown (570mm) |
|||
|
Ceiling cut-out sizes: Model No's 2153 to 2680 - 1220mm x 570mm |
|||
|
Ceiling cut-out sizes: Model No's 2830 to 3840 - 1520mm x 570mm |
|||
|
MODEL |
CEILING HEIGHT |
UNFOLD (A) |
REST POINT (B) |
|
2153 |
2150mm-2300mm |
1595mm |
1465mm |
|
2345 |
2300mm-2450mm |
1670mm |
1525mm |
|
2460 |
2450mm-2600mm |
1720mm |
1555mm |
|
2680 |
2600mm-2800mm |
1830mm |
1700mm |
|
2830 |
2800mm-3000mm |
1950mm |
1790mm |
|
3020 |
3000mm-3200mm |
2050mm |
1855mm |
|
3240 |
3200mm-3400mm |
2145mm |
1970mm |
|
3460 |
3400mm-3600mm |
2210mm |
2005mm |
|
3680 |
3600mm-3800mm |
Manufactured on-grade at 68° approx., to exact ceiling height |
|
|
3840 |
3800mm-3995mm |
||
|
From 4000mm Measurements and Cut-out To Be Advised |
|||
|
NO ASSEMBLY, NO CUTTING, NO MISTAKES. |
|||
We offer a professional installation service for the following attic ladders, domestic or commercial:
We service Melbourne wide including the following suburbs:
Abbotsford
Alexandria
Altona
Ashburton
Ashwood
Bacchus-Marsh
Bairnsdale
Ballarat
Balwyn
Bayswater
Belgrave
Bendigo
Bentleigh
Berwick
Blackburn
Boronia
Box-Hill
Braeside
Braybrook
Brooklyn
Brunswick
Bundoora
Burnside
Burwood-Highway
Camberwell
Campbellfield
Canterbury
Carlton
Caroline-Springs
Carrum-Downs
Caulfield
Chadstone
Chelsea
Cheltenham
Chirnside-Park
CSIRO TA 307 APPRAISAL
 BUILDING CODE of AUSTRALIA 1996
In the opinion of CSIRO Appraisals, the AM-BOSS Access Ladder described in this Technical Assessment and installed under the conditions listed in this Technical Assessment will satisfy the Performance Requirements of clauses DP1 and DP2 (Volume 1 - Class 2 to Class 9 buildings) and P2.5.1 (Volume 2 - Class 1 and 10 buildings) of the Building Code of Australia 1996 (up to Amendment No. 12).

APPROVED ASSESSMENT EXTRACT
The AM-BOSS Access Ladder as supplied by AM-BOSS Access Ladders Pty Ltd (ACN 007 214 959), North Sunshine, Victoria is suitable for providing ladder access to ceiling/roof spaces and plant/equipment areas in buildings when the conditions listed in CSIRO Technical Assessment 307 are fulfilled.
CSIRO BUILDING PRODUCTS & SYSTEMS APPRAISAL, TECHNICAL ASSESSMENT 307, AUSTRALIA
AM-BOSS Access Ladders have been manufacturing pull down access ladders and other types of ladders since 1979.
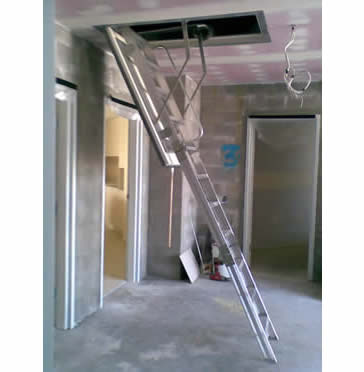
Pull down access ladders are easily installed into all types of ceilings including suspended and lathen plaster ceilings to give safe access to walk ways and plant platforms inside of roof cavities. Access to roof tops incorporating an AM-BOSS Access ladder and a secondary fixed ladder to the under side of the roof hatch with or without telescopic stanchions, makes servicing air conditioning plants on the roof a safe and easy operation.
AM-BOSS Access Ladders comply to the Building Code of Australia 1996
If you should have any queries regarding this matter of product please do not hesitate to contact Werner
Notes:
(i) The inclusion of this clause with reference to the BCA is aimed at assisting those involved in the building approval/permit process relate the Appraisal to the relevant regulations.
(ii) Any changes made to the BCA will be reviewed during the term of validity of this Technical Assessment and, where necessary, any amendment required will be published on the CSIRO Appraisals web pages on http://www.dbce.csiro.au
AM-BOSS Access Ladders is certified to install and test Fall Arrest Systems such as Anchor Points, Static Lines, LadLines and Abseil Anchors; and are equipped for Inspection and Maintenance to ensure compliance with AS1891.1, 2, 3, 4 for Fall Protection and Working At Height.
11-13 Maida Avenue,
North Sunshine VIC 3020 AUSTRALIA
PHONE :
(03) 9366 0899 or
(03) 9310 8788
OPENING HOURS :
Mon-Fri 8:00AM - 4:00PM