Domestic
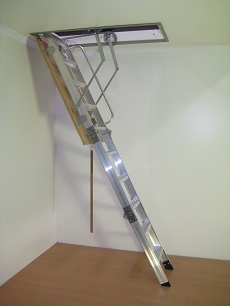
AM-BOSS present a domestic series of loft ladders that allows you to safely access and utilise empty roof space.


AM-BOSS pull-down access ladders with CodeMark certification are compliant when manufactured
Unauthorised altering, modifying, cutting, or failure to follow the appropriate Installation Guide will
VOID our Warranty and CodeMark certification
 BUILDING CODE of AUSTRALIA 1996
In the opinion of CSIRO Appraisals, the AM-BOSS Access Ladder described in this Technical Assessment and installed under the conditions listed in this Technical Assessment will satisfy the Performance Requirements of clauses DP1 and DP2 (Volume 1 - Class 2 to Class 9 buildings) and P2.5.1 (Volume 2 - Class 1 and 10 buildings) of the Building Code of Australia 1996 (up to Amendment No. 12).
The AM-BOSS Access Ladder as supplied by AM-BOSS Access Ladders Pty Ltd (ACN 007 214 959), North Sunshine, Victoria is suitable for providing ladder access to ceiling/roof spaces and plant/equipment areas in buildings when the conditions listed in CSIRO Technical Assessment 307 are fulfilled.
AM-BOSS Access Ladders have been manufacturing pull down access ladders and other types of ladders since 1979.
Pull down access ladders are easily installed into all types of ceilings including suspended and lathen plaster ceilings to give safe access to walk ways and plant platforms inside of roof cavities. Access to roof tops incorporating an AM-BOSS Access ladder and a secondary fixed ladder to the under side of the roof hatch with or without telescopic stanchions, makes servicing air conditioning plants on the roof a safe and easy operation.
AM-BOSS Access Ladders comply to the Building Code of Australia 1996
If you should have any queries regarding this matter of product please do not hesitate to contact us.
Notes:
(i) The inclusion of this clause with reference to the BCA is aimed at assisting those involved in the building approval/permit process relate the Appraisal to the relevant regulations.
(ii) Any changes made to the BCA will be reviewed during the term of validity of this Technical Assessment and, where necessary, any amendment required will be published on the CSIRO Appraisals web pages on http://www.dbce.csiro.au
Guide To Installation: AM-BOSS Access-Boss
Guide To Installation: AM-BOSS All-Metal Access Ladder
Guide To Installation: AM-BOSS Big-Boss
Guide To Installation: AM-BOSS Into Suspended Ceilings
Guide To Installation: AM-BOSS Fire Rated Access Ladder
AM-BOSS Access Ladders are CodeMark Certified
! IMPORTANT ! READ ALL OF THIS TEXT, TO PREVENT INJURY AND AVOID MISTAKES
GUIDE TO INSTALLATION FOR TYPES: ‘ACCESS-BOSS™’
STEP ONE: To get started, find the right location. Easy access top and bottom is essential. Make sure there is enough room to unfold the ladder (refer to Diagram / Table overleaf – Maximum Clearance at 60°).
IMPORTANT NOTE: CUT-OUT NOT TO BE WIDER AS SHOWN (570mm)
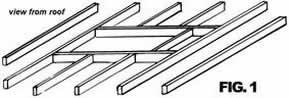
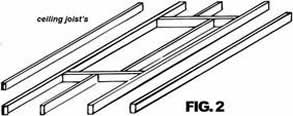
STEP TWO: What you need to make the opening – Timber Joist (Fig. 1 and Fig. 2): Timber, MPG10, 90x45mm pine or hardwood, about four (4) metres will be enough, pick a straight piece with minimal knots, and about 2 doz. 90mm long nails.
What you need to make the opening – Trusses (Fig. 3):
Trusses at 600mm centres should give you a clear distance of 565mm between. Insert a trimmer at length of 568mm (if Trusses are spaced at less than 565mm in between, smaller hatches can be manufactured at extra cost). DO NOT CUT TRUSSES without Building Surveyor approval.
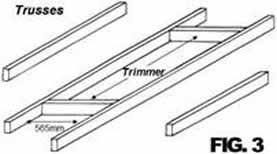
Web of trusses NOT SHOWN for clarity of sketch.
To mark out the opening on the ceiling: Either (from below) hammer nails through the plaster or (from above) measure from the top plates of the walls, which are usually visible. DO NOT STAND on the plaster ceiling or on timber joists that you had to cut, before it is nailed back to secure timber. A short plank is handy. It is best to do the timber work first, from above. Double check the cut out size and measure diagonally for square, if correct, cut out the plaster. You are now ready to install the unit.
Once the opening in the ceiling has been made, installation is a breeze.
! IMPORTANT ! READ ALL OF THIS TEXT, TO PREVENT INJURY AND AVOID MISTAKES
STEP THREE: Installation of the pull-down access ladder, into the readymade opening: Fit eyebolt to panel. Make sure opening end of hatch is where it should open and have someone assist you for 5 minutes to push the fully assembled access ladder into the ceiling, ensuring the architrave is hard against the plaster. The unit is now in the right position and should not fall back out - fitted Fixing Clips will take care of that. Gently open the hatch panel with the hook & pole supplied, by placing the hook through the eyebolt, (at this time, with one hand keeping pressure against the architrave at the opening end) immediately screw one screw (8 x Type 17 Hex screws 12-11 x 65mm supplied, or use similar) into each pre-drilled hole on either side at opening end through frame to timber to secure. Unfold the ladder. DO NOT WALK ON THE LADDER AT THIS TIME. Now screw remaining six (2x3) screws into the remaining pre-drilled holes. You may have to loosen or tighten the eight (8) fixing screws on one side or the other to adjust the gap evenly on both sides between the architrave and the panel. Now all you have to do is adjust the ladder (two screws with lock nuts – refer Adjustment sticker inside frame), so that feet are on the floor and hinges are closed ie butted against each other, finished.
If you cannot get someone to help you: Remove the ladder assembly only from the panel, (4 or 6 nuts depending on model) to lighten the load. Make sure the hatch panel opens at the right end. With a rope, pull the hatch from above into the ceiling. Make sure the hatch-architrave is hard against the ceiling. Fix the frame by screwing the eight screws (supplied) through frame to timber to secure. From below open the hatch, ! ATTENTION ! Be careful - without the weight of the ladder it is possible for the panel to fly up. Keep the ladder assembly nearby and fit it back on the panel with the 4 or 6 nuts. Do not over tighten the nuts. You may have to loosen or tighten the eight (8) fixing screws on one side or the other to adjust the gap evenly on both sides between the architrave and the panel. Now all you have to do is adjust the ladder (two screws with lock nuts – refer Adjustment sticker inside frame), so that feet are on the floor and hinges are closed ie butted against each other, finished.
You are now ready to enjoy your new access system.
! IMPORTANT ! READ ALL OF THIS TEXT, TO PREVENT INJURY AND AVOID MISTAKES
OPERATING AND MAINTANANCE PROCEDURE
ON AM-BOSS ACCESS LADDERS
Am-boss Access Ladders work on a reliable counter balance spring system.
OPENING
Engage hook on pole (supplied) into small eyelet on opening end of ceiling access panel. Gently pull door open till it comes to rest against the stops on the adjusting mechanism. No need to unhook the pole from the panel. With both hands unfold and extend the ladder to the floor.
CLOSING
With both hands lift up bottom section of ladder and fold back up on top of each other. With the use of the pole gently first push then ease panel back up till it is fully closed. The spring counter balance system will keep the panel shut.
All moving parts are factory pre-lubricated and lubrication should not be required for some time. However should operation of the unit be in excess of 3 to 5 times a day, all moving parts are to be lubricated once every two months. Most important is the lubrication of the Pivot Point of the linkage-arms joined to the side plate with the adjusting system. This part does most of the work.
INSPECTION OF THE WHOLE SYSTEM SHALL BE CARRIED OUT ONE A YEAR AND ACTION TAKEN
Cut out NOT TO BE WIDER as shown (570mm)
Ceiling cut-out sizes: Model No's 2153 to 2680 - 1220mm x 570mm
Ceiling cut-out sizes: Model No's 2830 to 3840* - 1520mm x 570mm
* Ceiling cut-out for Model 3840 for ceiling heights from 3945mm to 3995mm - 1620mm x 570mm
|
MODEL |
CEILING HEIGHT |
UNFOLD (A) |
REST POINT (B) |
|---|---|---|---|
|
2153 |
2150mm-2300mm |
1595mm |
1465mm |
|
2345 |
2300mm-2450mm |
1670mm |
1525mm |
|
2460 |
2450mm-2600mm |
1720mm |
1555mm |
|
2680 |
2600mm-2800mm |
1830mm |
1700mm |
|
2830 |
2800mm-3000mm |
1950mm |
1790mm |
|
3020 |
3000mm-3200mm |
2050mm |
1855mm |
|
3240 |
3200mm-3400mm |
2145mm |
1970mm |
|
3460 |
3400mm-3600mm |
2210mm |
2005mm |
|
3680 |
3600mm-3800mm |
Manufactured on-grade at 68° approx., |
|
|
3840 |
3800mm-3995mm |
||
|
From 4000mm Measurements and Cut-out To Be Advised |
|||
|
NO ASSEMBLY, NO CUTTING, NO MISTAKES. |
|||
| AM-BOSS Facts | |
|---|---|
| FACT: FIRST | 1979: AM-BOSS came onto the Australian market as the FIRST Australian-made attic access ladder. |
| FACT: FIRST | 1980’s: AM-BOSS pioneered installations into Suspended Ceilings. |
| FACT: FIRST | 1996: AM-BOSS attic access ladders are physically tested and rated at 150kg at any given point – THIS IS NOT SPREAD WEIGHT! |
| FACT: FIRST | 1996: AM-BOSS attic access ladders are the FIRST and ONLY ones to offer a 20 Year Warranty on our aluminium Domestic Series range |
| FACT: FIRST | 2003: AM-BOSS attic access ladders are the FIRST and ONLY ones to comply to the Building Code of Australia (BCA). |
| FACT: FIRST | 2008: September 2008 AM-BOSS has the “AM-BOSS Inferno-Boss™” tested for compliance to AS1530.4-2005. |
| 2008: December 2008 AM-BOSS launches the FIRST 100% Australian Owned and Made Fire Rated pull-down attic access ladder that complies to AS1530.4-2005 with a -/90/90 rating. | |
| FACT: FIRST | 2009: August 2009 AM-BOSS launches its new “Heavy Duty” series with an attic access ladder that tested and rated at a whopping 400kg at any given point – THIS IS NOT SPREAD WEIGHT! |
| FACT: FIRST | 2011: AM-BOSS attic access ladders again lead the industry by becoming the first company to have an attic access ladder that is CodeMark Certified and are still the only tread-style (attic) access ladder to comply |
| Obtaining a CodeMark Certificate of Conformity for a product or system is the only way to gain mandatory acceptance of the product or system compliance with the BCA. | |
Attic ladders manufactured by AM-BOSS and our imported concertina-stairs are so useful that we have installed them in various locations. Here are some examples.
Antarctica—Research Stations
The research bases in Antarctica generally contain fragile science equipment that must be stored in spaces that are already cramped. The 'Access-Boss’ allows for more efficient use of available space.
USA, The Middle East and many other countries
Our range of attic ladders are very popular, especially in the Middle East. This is due to tall houses being built on a small floorplan when compared to Australian homes. Again, efficient use of space is the reason why our clients invest in our products. Similarly, the fact that we can manufacture to suit most environments has proven popular in the USA.
HMAS Cerberus
The Royal Australian Navy (RAN) incorporated AM-BOSS ‘Access-Boss™’ pull-down access ladders on their military base. This is because our design works well in confined spaces and the pull-down access ladder folds neatly away to minimise foot traffic issues in the corridors.
Airport Control Towers
AM-BOSS products have been fitted at numerous airports both domestically and overseas, to give safer access to control tower rooftops and plant platforms where technicians maintain an array of antennas and equipment.
Hospitals, Schools & Commercial Establishments
AM-BOSS offers a commercial series range for use by individuals / trades people to gain access to ductwork, water storage, light fixtures and more. Neatly concealed within the ceiling space, the AM-BOSS pull-down access ladder system is always on hand and will only interfere with floor space when in use. All of our products are designed to meet your specific needs.
To learn more about our products and services call us today.
AM-BOSS Access Ladders is certified to install and test Fall Arrest Systems such as Anchor Points, Static Lines, LadLines and Abseil Anchors; and are equipped for Inspection and Maintenance to ensure compliance with AS1891.1, 2, 3, 4 for Fall Protection and Working At Height.
11-13 Maida Avenue,
North Sunshine VIC 3020 AUSTRALIA
PHONE :
(03) 9366 0899 or
(03) 9310 8788
OPENING HOURS :
Mon-Fri 8:00AM - 4:00PM